Quantcast
Channel: A Work in Progress
Viewing all 144 articles
Browse latest View live

Focusing on Life - 51 and 52

$
0
0
Of course, I'm behind again on Sally's Focus on Life series.  Rather than do separate posts, this time, I thought I would just combine the last two.

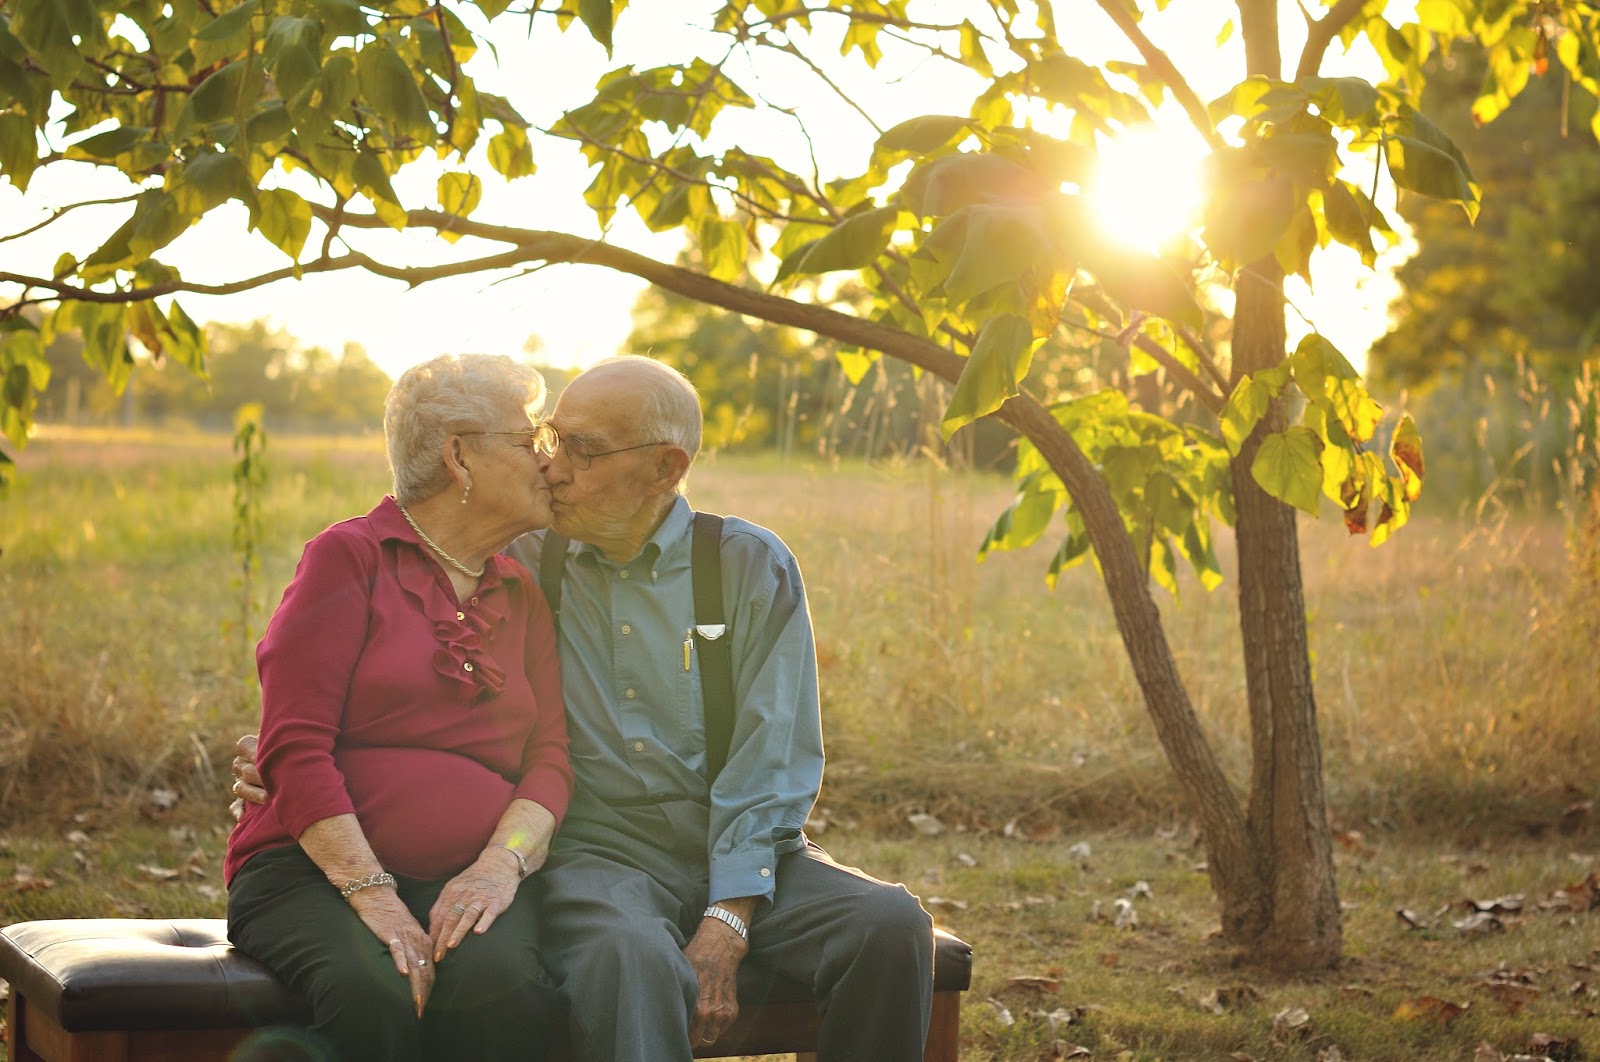
For week 51, Sally asked us to photograph "togetherness." I had the perfect idea.

A few years ago, I mentioned that my aunt hosted a cookie party every year.  It's usually the Saturday before Christmas and several aunts and cousins converge upon a single house to bake about more dozens and dozens of cookies.  (Seriously, about 9 or 10 batches of cookies.)

I the post above, I showed you the cookies.  In this post, I wanted to show you the people.


I think there may be a few of my aunts not in the picture and the kids were off playing, but you get the idea.  It's one of the best examples of "togetherness" I'll ever find.

For week 52, Sally asked us to capture "goodbye."

This was a bit hard for me.  Luckily, as in past weeks, the kiddo was ready to help.


If you were wondering, she drew her hand waving below the words.

Sally, thank you for this wonderful experience.

If any of you are interested, Sally has renewed her "focus on life" series for 2014.  You can find the details here.

Since I was frequently behind in 2013, I opted not to take part in 2014.  That won't stop me from following along, however.  You can also find the first week's photos here.

2014 Word of the Year

$
0
0
For the past few years, I have joined several bloggers in choosing a word to help me though the coming year.

This year, I chose the word "today."


I chose this word for two reasons:

First, over the past year, I found myself saying, "I can do that tomorrow."

You know the drill:
       I'll start running again tomorrow.
       I'll clean that tomorrow.
       I'll finish this project tomorrow.

Unfortunately, there is always another tomorrow and it's so easy to forget about today.

So, for 2014, I want to do things TODAY.

Second, I've noticed that worrying about what tomorrow will bring makes enjoying the day much harder.

My karate instructor's instructor (my karate grandfather) said something in class a few weeks ago that rang true:  "thinking about the past brings regret and thinking about the future brings worry, so think about the present." He was talking about kata, but it applies to our lives as well.

I found this quote by Henry David Thoreau that sums it up perfectly:

"You must live in the present, launch yourself on every wave, find eternity in each moment."

It sums up what I hope my attitude will be in 2014 -- take pleasure and pride in each day, accomplish what you can and forget about tomorrow.

My blogging review of 2013

$
0
0
2013 was my second full year of blogging.  My goal was 100 posts and I fell short of that by 3.  Still, 97 posts aren't too bad.

50 of those posts were part of Sally Russick's "Focus on Life" series.  (The last two were posted in January.)

Sally's idea was to take one photograph a week, concentrating on our day to day lives.

I missed a few weeks here and there, but ultimately, was able to catch up and offer 52 photos for the year.

Here are a few of my favorites:


Like last year, I participated in several beading challenges.

My favorites this year were Erin Prais-Hintz's Challenge of Travel and Christine Altmiller's Rolling Blog Hop.

I made this beauty in honor of the fountains in Kansas city.


I made a similar necklace using a spool from Christine.


As you might be able to tell from the photos above, I took an interest in chain maille this year, thanks to Rebeca Mojica, founder of Blue Buddha Boutique.

This bracelet, made from Rebeca's Intricate Chain Maille pattern, is my favorite to date.


In non beading news, I hit a milestone in 2012 and achieved my first black belt in karate.


That brick held the honor of being my arch nemesis for some time, but I am happy to say, I prevailed.

My weapons test was postponed from October 2012 to April 2013, so I will spend the first part of 2013 with these.


We took our second family vacation in July of 2013.  We visited Chicago and the kiddo has a fabulous time at the aquarium, the planetarium, the zoo and the nature museum, not to mention the hotel pool.


About a month after our vacation, the kiddo started first grade.  *sniff*  Her first year of all day school was a success and I cannot believe how well she is reading and writing after only 5 months of school.

Her math skills are also out of this world, thanks to her keeping score in Five Crowns.  It is truly amazing to watch her grow and learn.

According to google analytics, from January 1 - December 31, 2013, a whopping 11,691 people visited my blog a total of 16,098 times and viewed 27,479 pages.

While most of my blog traffic originated from google searches, a few referring sites stood out:
This was my most popular post in 2013, though it was written in 2012.

I would like to thank everyone who has visited, commented on and followed my blog in 2013.  Every page hit and every comment means the world to me.

I hope everyone has a wonderful 2014.

Time to Stitch 4

$
0
0
It's time for another Time to Stitch challenge with Therese Frank and Christine Altmiller.

This time around, our main stitch was netting and we had a choice of three other stitches:  spiral, chevron and chenille.

This was a hard challenge for me.  I rarely use netting and I wasn't sure where to start.

I tried to bezel a rivoli with netting.  Unfortunately, I started with 46 beads, which put me at 23 beads around the outside.  An odd number of beads doesn't always work.  I ended up looping the beads a second time to come out even.

So, the netting didn't work out as I had intended.  It still looks nice, though.


I thought about making a netted base for my pendant, but remembered this tutorial by Nancy Dale.  Nancy's Trellis Necklace was one of our Beading Babes projects a few years ago.  I have wanted to make another for some time and this was a perfect opportunity.


Nancy's design starts with a right angle weave base, then adds a netted overlay.  The result is a gorgeous rope.  It take a bit longer to bead, but it's so luxurious that it's more than worth the time.

If you haven't looked at Nancy's tutorial, run to her shop.  She offers many other gorgeous tutorials in addition to the Trellis Necklace.


I love how it turned out.  I wouldn't normally gravitate to blue and purple, but it works so well.

I wanted to try another stitch as well, and found a design by Yvanne Ham that used 4mm beads in a chevron chain.  Yvanne's "Chevron Chain with Flowers" was published in the April 2007 issue of Bead and Button.


Looking at the bracelet, I would never have guessed chevron stitch, but it is and it makes a wonderful pattern.

Finally, I decided to take a stab at a netted pendant again.  This time, I took inspiration from Sonoku Nozue.  Sonoku's book, Japanese Beadwork, is fabulous.  I used her "Snow Crystal" brooch as a basis for this pendant.


There are three layers of netting in the pendant and it looks fabulous.

I finished the necklace with a cellini spiral and ribbon.


Therese and Christine, thank you for another lovely challenge.

It's so easy to fall into a "beading rut." I need constant reminders that other stitches exist.  :)

Please take some time to visit the other participants.  I know you will see some beautiful creations.


Tanya Goodwin - you are here

More Beaded Lace

$
0
0
For my Time to Stitch entry, click here.

I mentioned in this post that I have been following Gwen Fisher in her beaded lace adventures.

Since I made this necklace, I've wanted to make a second one.  I finally found some time and created a focal using Gwen's Beaded Lace Medallions and Beaded Lace Hearts.


I kept the rest simple and finished the necklace with a Beaded Lace Swag.


I love the end result.


The necklace is soft and feminine in these colors.  An edgier version in red/ black would also be stunning.

As per usual, I finished the piece with a beaded clasp.


I am intrigued by these techniques and have more ideas swirling around in my head.

I am particularly taken with Gwen's latest pattern, Beaded Rick Rack


I can't wait to start on it.

The Beaded Rick Rack is part 7 of Gwen's series.

Parts 1 - 6 are:

Athena's Acanthus bracelet
Beaded Lace Flowers
Beaded Lace Swags
Beaded Lace Medallions
Eucalyptus Leaves bracelet
Beaded Lace Hearts

If you haven't already looked at them, I highly recommend these patterns.  The two bracelet patterns teach you to create a finished piece of jewelry and the others focus on a specific component or technique.

What makes this series unique is that the components can be combined to create different designs and pieces.  Each tutorial shows different arrangements and combinations for inspiration.

They are all available in Gwen's etsy shop.

You can find other patterns from Gwen and Florence Turnour on their website, Bead Infinitum.

New Year's necklace

$
0
0
So, it turns out, that without weekly challenges, I don't post near as often.

Part of that stems from my lack of creative mojo lately and part of that stems from my inability to finish projects (see lack of creative mojo).

Case in point:  I wanted to make a necklace to help me keep my word of the year in the forefront of my mind.

I asked Erin Prais-Hintz to make one of her story beads for me with this quote Henry David Thoreau:

"You must live in the present, 
launch yourself on every wave, 
find eternity in each moment."

That quote was a bit long, so we decided to leave out the middle part.


The bead turned out beautifully and I immediately started on a necklace to showcase it.

And then I started again ...

and again ..

and again.

I wanted this to be "perfect." You know, drop dead gorgeous, I couldn't imagine anything better, perfect.  Unfortunately, it just wasn't happening.

So, I stopped trying for perfection and just started beading.

I wanted a multi strand necklace, so I made two twisted herringbone ropes.


I finished the necklace with the pendant hanging on the side.  The kiddo took one look  at it and looped it around her neck with the pendant hanging down in the middle.

The kiddo's design sense is usually spot on, so I re-worked a bit.  It turns out, she was right.  Before, it looked like I was trying too hard.  The pendant is also heavier than the beaded ropes, so it had a tendency to pull forward.

I wish I had snapped a "before" photo for you.  Instead, take my word that this is a better design.


The clasp ended up in the front and I like it there.  The pendant hangs nicely in the middle and I can twist it on the headpin to read the entire phrase.

If you haven't already, check out Erin's store.  You can custom order your very own story bead or one of Erin's simple truth pendants.

Dragon's Eye Pendants

$
0
0
I was excited to see the pattern for Lisa Smeltzer's Dragon's Eye Pendant at Blue Buddha Boutique.

Blue Buddha marked this as an expert pattern and I could see why.  You need to know European 4 in 1 and half Persian 3 in 1 *very* well and you need to know how to join the edges.  A few of the ring placements are very tight as well.

Since I knew it was a hard project going in, I went slowly and checked the pattern every 4.5 seconds to make sure I was doing everything correctly.

The first part, European 4 in 1, was straight forward, as was the Persian edging.  The joining of the edges, though, was another story.

After more attempts than I care to admit, I started from scratch and found that it was easier for me to join the base before adding the edging.  After that it was smooth sailing until the very last step.

The front of the pendant looked great, but I couldn't get those pesky rings to work on the back.

This is the front:


This is the back:


Do you see how the violet rings are sitting on top of the copper rings?  That isn't correct.

I tried several times, but resigned myself to the fact that the back rings would sit on top.  It didn't really look that bad, right?

I posted my pendant to Blue Buddha's facebook page.  Someone there was kind enough to draw my ring path on my photo and put it side by side with a photo showing the correct ring path.  Then it clicked.

I have no idea what I was doing wrong or what I started doing right (they still look the same to me), but it worked!

I quickly (well, I gathered the materials quickly) made another pendant.


I noticed that aluminum rings in the middle were not as tight as the copper rings I had used in the first pendant.  I tried another with brass rings in the middle.


Brass rings were also looser than copper ones.  I liked the way these two looked, so I took the first pendant apart and re-worked it with aluminum rings in the center.


I might try another with copper in the center, just to see if I did something different/wrong on my first try.  Different metals, though, sometimes yield different results, so it might just be that copper rings are tighter than other metals.

I noticed that the last pendant worked up much (much) more quickly than the first and second ones.  I'm excited about that because I want a small army of these things.


I think they will look great as pendants and I want to build necklaces around them.

These are not for the  faint of heart, though.  Each pendant measures about 2 inches in diameter -- pretty substantial.  Luckily, aluminum rings are very light and the pendants are not that heavy.

Chain Maille Bracelets

$
0
0
For the past few weeks, I've been beading several special projects.

The first was my new year's necklace.  I couldn't be more thrilled with how it turned out, but it went through more than one reconstruction.

I've also been working on a something for a special February edition of She Made/She Made, hosted by Therese Frank and Christine Altmiller.

I know, you can't stand the wait, can you?  I'll give me a sneak peek.


Check back on February 28 for the reveal.

Finally, I've been working with components made by Sharyl from Sharyl's Jewelry.  Another sneak peek?  Okay, since you asked.


I plan to share my creations using Sharyl's components next week, so stay tuned.

In the mean time, I've managed to complete a few bracelets.


From left to right, they are:

Sleek Cuff - I love how this turned out.  It's a quick pattern (it took me one afternoon to complete) and looks fabulous.


Double Cylon bracelet - This was also a fun bracelet once the final step clicked.  This version is two lengths of cylon weave joined together.  I love how it looks in copper and brass.  


Fire Wyrm - This might be my new favorite weave.  It is a different spin on full Persian and I love how it looks.  This one is in all copper, but I could see adding a bit of color.


Dragonscale - I think I started this bracelet around Thanksgiving.  It's one of those weaves that takes a long time, or at least it seemed to.  I finally made myself finish it and I love how it looks.


Of course, all of these patterns came from Blue Buddha.  (No, I don't work there, even though it seems that I'm plugging their tutorials every week). 

I still have those dragon's eye pendants on my table, so hopefully, I'll have some other finished pieces to share with you soon.

Fun with polymer clay beads and pendants

$
0
0

Recently, I met my friend Sharyl, from Sharyl's Jewelry for lunch and she was kind enough to invite me to her home to see her work space.

Sharyl is a multi media artist/designer who creates gorgeous jewelry and beautiful metal components. Lately, Sharyl was bitten by the polymer clay bug and she has been creating fabulous clay components.

While I was visiting Sharyl, I picked up a few things and she gifted me a pendant.

I knew exactly what I wanted to do with it, which is unusual for me.

I made a cellini spiral and started a few lengths of chain maille and started them in an ammonia patina.

Unfortunately, the blue color from the ammonia wasn't quite what I wanted. It's gorgeous though, and I have other ideas for it.

I went back to the drawing board and dug out ribbons, chain, leather, and anything else I could find.

After several backs and forths, I settled on leather.

Sharyl does an amazing job with color on all her components and I love how the color and texture play off of each other and the leather.

You can find a similar pendant (with a Kansas wheat coloring) here. (But only if you hurry, this one is on my wish list.) :)

While I was contemplating how to finish the necklace, I started browsing though my (not so small) collection of Sharyl's components.

I found that her metal components worked well with her clay pieces and made a pair of earrings.


The large rings are from Miss Fickle Media and were the perfect size.

I loved how these looked and went to town!


Sharyl mentioned that the products she uses on the metal components are different than the ones she uses to color the clay. I would not have imagined that, as the colors compliment each other so well.

Right now, I've got my eye on these links and these charms. I think they would look so cute together.

When I ran out of metal links, I tried something else.


I love how these look like little flowers. I couldn't decide whether I should hang little drops from the bottom or not, so for now, they are plain. I might go back and add something later.

You can find Sharyl's creations in her artfire store.

Check out the polymer clay section of her store for more clay components.

You can find Sharyl's altered metal components here and her handmade metal components here.

She Made/She Made - February 2014

$
0
0
For the past year or so, Therese Frank and Christine Altmiller have participated in a monthly She Made/She Made, using beads they exchanged when they met.  It's been fun to watch and to read about what each of them made with the same beads.

A few months ago, Therese found these awesome clay faces at the Kentuck Festival of the Arts.


They were made by Susan Clayton and are just amazing to see.

Therese bought a few extra and asked six of us to join them for this month's She Made/She Made.  I am honored to be in that group.

When I received the face, I couldn't stop looking at it.  There is so much character in that little face.

I immediately envisioned a wise woman or elder and wanted to create something that did justice to Susan's beautiful work.

It was the perfect time to try working with shibori ribbon.  I love the texture created by the folds of the ribbon.  With a bit of practice, I was able to shape the ribbon around the face.


A bit of embroidery and I was done.


Of course, after I cut the oval shape out, I noticed the face was a bit off center.  I guess she's looking at something.  :)

I wanted to keep the rest of the necklace simple, so I layered strands of chain and ribbon.


Therese and Christine, thank you so much for letting me play along with you this month.  I really enjoyed working with the face.

Please take some time to see what the other ladies did with their faces.  You won't be disappointed.

Therese Frank - our hostess
Christine Altmiller - our hostess
Tanya - you are here
Cynthia
Alicia


3rd Annual Challenge of Music

$
0
0
For my She Made/She Made entry, click here.

Miss Erin gleans inspiration from many different places: her hometown, music, hunks of rust, literature, and, of course, color.

Many times, she invites her readers to join her on an inspiration blog hop challenge. Some of my favorites creations have stemmed from Erin's challenges.

For this year's challenge of music, Erin asked us to pick a seminal year in our lives or a year that impacted our lives in some way, then pick a song from that year to inspire us.

This year marks my grandparents' 70th anniversary. They were married in February of 1944. I decided to pick a song from 1944 in honor of them.


"My Heart Tells Me," sung by Glen Gray, was top of the charts in February, 1944, but that song didn't seem to capture 70 years of marriage. I opted instead for "Swinging on a Star," sung by Bing Crosby. It was top of the charts in August and September, 1944.


I liked the playfulness of the lyrics:
Would you like to swing on a star
Carry moonbeams home in a jar
And be better off than you are
Or would you rather be a mule?

The part that really struck me was "be better off than you are." The right person makes you be better than you are. My grandparents spent a lifetime making each other -- and all of us -- better every day.


This is one of my favorite photos of my grandparents, taken by Mae-Belle Photography.

To celebrate their 70th, my mom and her brothers and sisters threw a party. I may have mentioned before, but my mom has 12 siblings. There are 32 grandchildren and over 30 great grandchildren.

Not everyone was there, but it was quite a party.


Words can't express how lucky we all are to have my grandparents still in our lives.

But, back to my song.

I wanted to capture the playfulness of the song and, at one point, wanted to bead a swing to hang from a star. Well, you can probably guess how that turned out.

After a few ... several ... too many tries to mention, I settled on this bead from Genea. I love the star on the front and the moon on the back. It was meant to be.


Speaking of Genea, she creates jewelry with a playful style. How she combines colors, textures and her beautiful beads in such a fabulous way is beyond me, but I decided to give it a shot.

I started with a celini spiral.


I added a few copper swirls and mixed some of Genea's wingdings with clay beads from Staci Louise and a glass bead from Sue Beads.


I am pretty enamored with how it came out.


If you haven't already visited these ladies' shops, please do so. You can find Genea here, Staci here and Sue here.

While I was fiddling with the necklace, looking at this focal or that bead, I also made earrings.

I paired small lengths of chain maille with these cute charms from Miss Erin herself.


Copper didn't work so well with Erin's charms, so I used a bit of patina and gilder's paste to give the rings a (hopefully) celestial look.

As a side note, I finally got the hang of the violet patina from Miss Fickle Media. The color is just swoon worthy, though too purple for my earrings. Hence the gilder's paste.

I love the movement of these earrings.

You can find more of Erin's creations here.

Erin, thank you for another wonderful challenge. I love that these challenges push me out of my comfort zone.

Please take some time to visit Erin's blog to see what songs the other participants chose what how those songs inspired them.

Or, you can click the links below.


Starbust Pendant in Bead Me Magazine

$
0
0
Last year, Allison from Bead Me Magazine asked if I would be part of their Bead Soup feature.  I never have to be asked twice and said "yes."

I made this pendant using a bead soup from Fusion Beads that featured superduo beads, crystal bicones, pearls and seed beads.


Allison liked the pendant and asked me to write up instructions.

I am please to say that my pendant was published in issue 6 of Bead Me Magazine.


It's even inset on the cover.  :)


I was bowled over to see the page featuring my pendants.  They look so yummy!

Right now, issue 6 is free from Apples's app store.  There are several great projects in it.  Definitely check it out.

Shibori ribbon blog hop challenge

$
0
0
Last week, I shared a pendant I made with shibori ribbon.


I had never worked with that type of ribbon before and really enjoyed it.

A few people commented that they had not seen shibori ribbon before and were interested in trying it out.

After an email conversation with Christine Altmiller, I decided to host a shibori ribbon challenge.

If you haven't played with shibori ribbon, you are in for a treat.  Shibori is a silk ribbon with accordion like folds running down the length of the ribbon.  You can stretch it (width wise) or scrunch it or both.  I've seen it used mostly for bead embroidery, but I think it could be used in many other ways.


I have 5 pieces of shibori ribbon up for grabs.  Each piece is 9" in length -- perfect for a bracelet or for a couple of pendants.

The rules:
   *  Leave a comment below if you would like to play -- be sure I have a way to contact you
   *  You do not need to have a blog.  I would be happy to show your work on my blog
   *  You do not have to be a bead weaver or learn to embroider.  I would love to see different ideas on how to use the ribbon.
   *  You have to use the ribbon in some way, but you don't have to make a piece of jewelry if you don't want to.
   *  I will pick winners randomly from the comments the morning of Monday, March 10 and (hopefully) send the ribbons out the next day.
   *  If you are not chosen, but have shibori ribbon, you are welcome to play along.
   *  The reveal will  be Monday, April 14.
   *  Above all, have fun and try something new!

If you've never worked with shibori ribbon and are wondering exactly how to use it, I found this link helpful when I started working on my pendant.

I have also started a pinterest board to spark our imaginations.

I hope you can join me!

Shibori Ribbon Blog Hop Challenge Winners

$
0
0
First, I would like to extend a big "thank you" to everyone who left a comment.  This will be my first time hosting a blog hop and I was a bit scared that no one would want to play.

I am so grateful to all of you that picked six winners instead of five and give away the ribbon I was going to keep for myself.  (I ordered another for me to play with.)

I picked the winners the "old fashioned way":


Maryanne
Alenka
Monique
Carolyn
Mary
Catherine

Congratulations!  I have your packages ready to go and will send them out as soon as I get your addresses.  (If you don't have an email from me already, please let me know.)

Also, a few people commented that they had ribbon and wanted to play:

Christine (I sent a ribbon to Christine after our email conversation)
Sharyl
thisgirl

I am so excited to see what everyone does with their ribbons.

Stay tuned for the reveal -- April 14!

Rondo à la Byzantine

$
0
0
I'm still on a chain maille kick and, this time, I went for a hefty necklace.


This necklace combines helm and byzantine and makes a wonderful statement necklace.

I'm not sure if you can tell, but this version uses brass and copper rings.


The difference is subtle, but I love the earthy look.

It is a bit weighty, due to the metal rings.  An aluminum version would be lighter and look amazing.

The pattern is in Rebeca Mojica's book, Chained.

More earrings using Sharyl's components

$
0
0
I mentioned in this post that I have been working with Sharyl's components.  A few people mentioned that we made a good team.  I think they are right.  :)

I was able to meet Sharyl again for lunch and shopping.  Well, Sharyl was gracious enough to allow me to shop in her studio.

I came away with several goodies, which I promptly turned into earrings.


The two pairs above use metal links from Miss Fickle Media.

I ran out of links, so I tried making my own, using this tutorial from Miss Fickle Media.


They turned out pretty well.  Next time, I might try to patina the links.

I really love how Sharyl's metal and clay components work so well together.  The colors really play off of each other.

Definitely check out her shop.

Shibori Ribbon Blog Hop

$
0
0
Today, I am so excited to host my first ever blog hop!

About a month ago, I gave away several 9 inch portions of shibori ribbon.

Shibori ribbon is made by Glennis Dolce, who uses a traditional technique to dye and create pleats in silk.  The result is a gorgeous ribbon with a ton of uses.

Definitely check out Glennis's bigcartel shop or her etsy shop.  The bigcartel shop also offers downloadable instructions and kits.

In preparing for this hop, I looked at many examples of projects using shibori ribbon.  You can see a sampling on my pinterest board.

I was taken with Glennis's shibori flowers and decided to try my hand at making one.


I paired the shibori flower with the flower part of Lisa Kan's Corsage Cuff, published in the February 2009 issue of Beadwork magazine.

I liked it so much that I made a hair clip.

The kiddo was kind enough to take an "action shot"


I just love the folds in the ribbon and how they move in and out.  I will definitely be playing with this ribbon more in the future.

Please take a few minutes and hop around to the participants.  I know you will love what they made.

Tanya - you are here
Maryanne
Alenka
Monique
Carolyn
Mary
Catherine
Christine
Sharyl
Therese

What a week!

$
0
0
This week has been fabulous!

First, I hosted my first ever blog hop and was amazed by what the participants created.


If you haven't already, take a few minutes and hop around.  Each lady did something different and absolutely stunning with the ribbon.

If I haven't said it already, I would like to say "THANK YOU" to all the participants.  Thank you for playing with me and for making it so fun to hop around.  Everything was beautiful.

Second, I received my black belt in Okinawan kobudo (weapons).


This test wasn't as nerve wracking as my last test, but I was still a bit worried.  Luckily, I didn't drop my nunchaku or toss my bo into the crowd.

It was also a bit nerve-wracking because my instructor's instructor attended, along with other "big dogs" who have been doing karate longer than I've been alive.

Everyone did a spectacular job, especially our two senior students testing for 4th black in kenpo.  They impressed the hanshis ("big dogs") so much that our senior students moved from 3rd black to 5th black -- an awesome promotion and well deserved.

Pieces and Parts

$
0
0
It all started when I won a giveaway from Tracee Dock of the Classic Bead.  Tracee was kind enough to send a gorgeous pendant and coordinating leather from her shop.


I wanted to use the dark purple leather Tracee sent and made this.


But, something wasn't quite right.  I didn't like the leather like I thought I would and I didn't like how I wirewrapped the ends.

Instead, I grabbed a piece of chain maille left over from who knows what and made this.


I like this much better.  I used Miss Fickle Media's violet patina on the chain and I like the softer purple.  It works much better with the colors of seed beads I chose.

I still wanted to use the leather, so I paired it with this pendant, also by Tracee.


Again, it didn't work.  I also didn't like the beaded part.  It was way to pink.

It looked perfect with this pendant by Marsha Neal, though.


I also added a few beads from Genea and Sue Beads.


I like the little bit of asymmetry.


But, back to the leather.

I dug out this pendant by Staci Louise.


Of course, the leather was a bit too short for what I wanted to do, so I paired it with another bit of chain maille.


I used the same violet patina on the chain maille portion.  I love the purple color.  I also mixed in a bit of mica powder (also from Miss Fickle Media).


I used a little less patina and a little more mica powder on the swirl.  I love how the tye dye look matches the pendant.

I still have that green pendant on my table, so I will likely find a use for it.  Stay tuned!

Pieces and Parts .. and Hearts

$
0
0
After my last post about finding homes for the pieces and parts that didn't quite work as I had intended, I decided to finally finish something that had be laying around for quite a while.

Do you remember me talking about the piece of chain maille I made (but didn't use) for this necklace?


Well, it finally found a home using a pendant by Nancy Schindler Adams.


The colors in the pendant are amazing and I echoed them in a cellini spiral (which is becoming my favorite way to highlight a pendant).


I'm in love!


Viewing all 144 articles
Browse latest View live


Latest Images